

Intuit Quickbooks is majorly developed for the day-to-day works of accounting and management used by small and medium-scale firms, businesses, and start-ups. Being a Quickbooks user, bugs and errors can be experienced while working on the software. One such QuickBooks error is the missing name list problem Quickbooks. But this is just a basic error and you must not worry as we are here with a detailed guide for you. You can find each and every significant piece of information related to the QuickBooks error missing name list problem in this article.
All you need to do is to go through each and every step carefully one by one. You have to carry out each method until you get the correct and intact solution. Without wasting any of your time, let us begin with the topic.
What is the Missing Name List Problem?
The “missing name list problem” QuickBooks is an error that you may experience while you try to open the Quickbooks company file. It is generally an issue that occurs in the Quickbooks desktop software because of various missing data and files.
Methods to Fix Quickbooks Missing Name List Problem
In case you face any problem or issue while operating the QuickBooks software, then do consider reading all the given methods attentively.
Method 1: Using Quickbooks File Doctor
- Firstly, download and install the Quickbooks tool hub software system via Intuit’s official website.
- Now access the tool hub.
- Reach out to the section Company file problems.
- After this, tap on the green-colored button Run Quickbooks File Doctor.
- Look out for the company file you are having issues with. Tap on the option Repair.
- The file doctor tool will self detect the errors and repair it. You will get a notification regarding it.
Method 2: Conducting a Clean Install
The clean install tool assists in eradicating the temporary and corrupted Quickbooks-related files. You will easily be able to perform a clean install of the Quickbooks software application for rectifying this error. Do as instructed below.
- Firstly, access the Quickbooks Tool Hub.
- Now, go to the tab Installation problems.
- After this, tap on the button Clean install tool.
- The clean install method will begin and resolve your error easily.
Method 3: Auto Data Recovery Use
You can make use of the initial dealing Log file and ADR of the company files for recovering all the recent transactions.
Points to be kept in mind before Performing Auto Data Recovery
The Quickbooks Auto Data Recovery (ADR) is present in the Quickbooks professional, Premier, and Enterprise versions.
- You cannot make use of the info recovery within the controller editions.
- The limit of the file size is only 1.5 GB.
- You always must make use of the latest version of Quickbooks software.
Now, let us start with the way to guide you to restore QuickBooks Auto Data Recovery.
- Create a folder on your QB Test Desktop.
- Access the company file directory folder.
- Look out for the .tlg extension to get into the company files and folders. It has a similar name as your QBs company file.
After carrying out Auto Data Recovery (ADR), you can also go for the Quickbooks audit trail turn-off.
How to Show file extensions?
If you’re not able to spot the .tlg file, you’ll have to try this below process to indicate the file extensions.
- Firstly, you need to hold Windows+E keys on the keyboard to access the File option.
- Now, choose the option Organize and then Folder and search choices.
- For Windows 8, 8.1, and 10, you’ll have to select read, then choose the file extension name.
- Next tap on the Hide extensions option for well-known file types.
- Simply hit Apply and then click on OK.
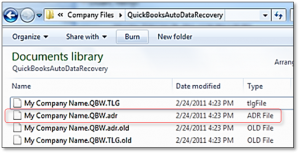
- Access the folder QuickBooksAutoDataRecovery. It has a similar directory location as your QBs company file.
- Copy the file QBW.adr and paste it into the folder QBTest. You are required to presently have a file .QBW.adr and .tlg in your folder QBTest.
- Under the QBTest folder, do a right-click on the .QBW.adr file and select the option Rename.
- Delete the .adr file.
- Access the QuickBooks software and also open the specified company file saved in your folder QBTest. Use your account register for verifying all transactions area units here.
- Choose the menu File and then the option Utilities and Verify the information for examining the knowledge integrity of the file recovered.
- If the copy of the company file is good, then you will be ready to move the corrupted company file to a specified location and transfer the file copy from the QBTest folder to the initial directory location.
ALSO VISIT : QuickBooks PDF Converter Not Working
Final Words
We hope you are now enlightened with the aspects of QuickBooks error missing name list problem repair utility and are no longer stuck in any such kind of problem. For any further assistance, you can go through the other QBs error-related articles on our website.